Learn how to take photos, merge them into one HDR image, and enhance it.
The High Dynamic Range technology, also known as HDR, involves taking photographs in groups; each group having a range of varied light-exposure images –usually from the lightest to the darkest exposure values. This can be achieved using an HDR application. Of course, you can use an online photo editor for this purpose, but the result can be unsatisfactory, so today we will talk about some of the best options.
Although the HDR photo technique has been in existence for over a decade, it had just been incorporated into Adobe’s Lightroom program only a few years ago.
So, how to HDR in Lightroom? This is a complex question, which we will try to tell you about in as much detail as possible. If you want to learn all the technical details of taking HDR photos, check this HDR photography guide; In this tutorial, you’d be learning how you can create HDR photography using the Lightroom HDR workspace. You’d also be finding out more about the advantages as well as the disadvantages of using Lightroom for your photo editing workflow.
Photo Merge: Using Lightroom’s HDR
The very first you’re required to do before merging photos in Lightroom is select the images you’d like to process; 3 to 5 exposures would do.
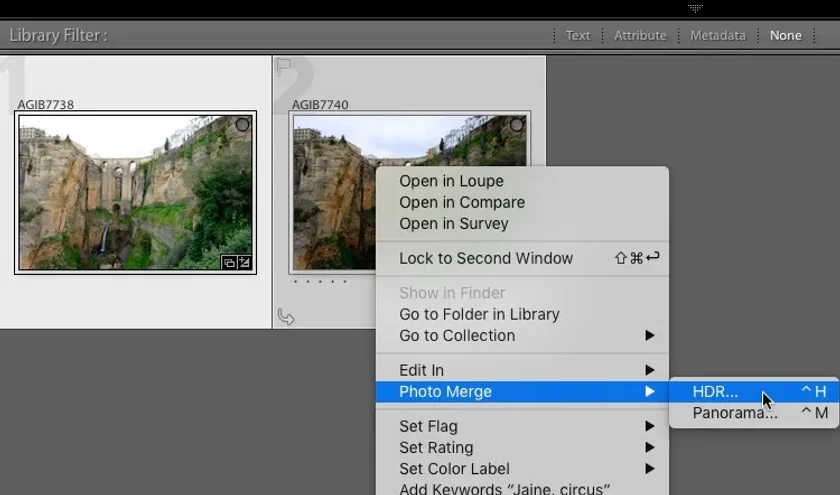
You may then proceed by selecting the appropriate HDR option:
- Use the Command-H shortcut on the keyboard
- Right-click to choose Photo Merge > HDR or
- Choose from the top menu, Photo > Photo Merge > HDR
Having done this, the system will go through a process of generating a preview image; a progress bar and a popup window would then be displayed on the screen.
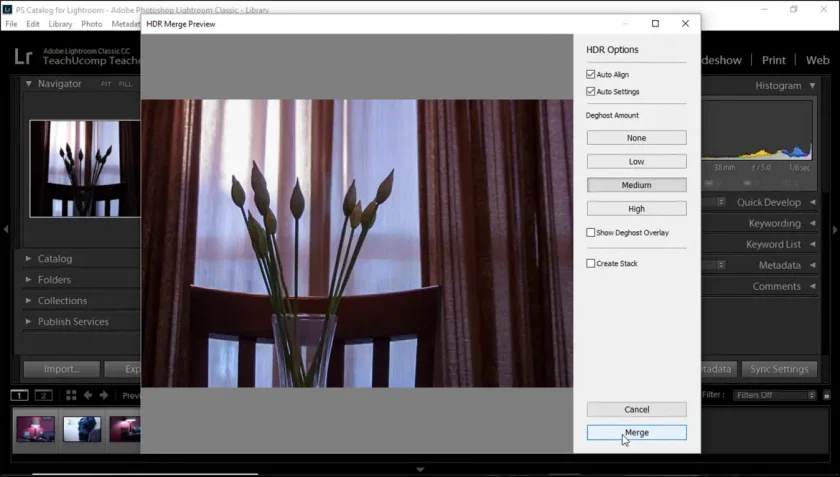
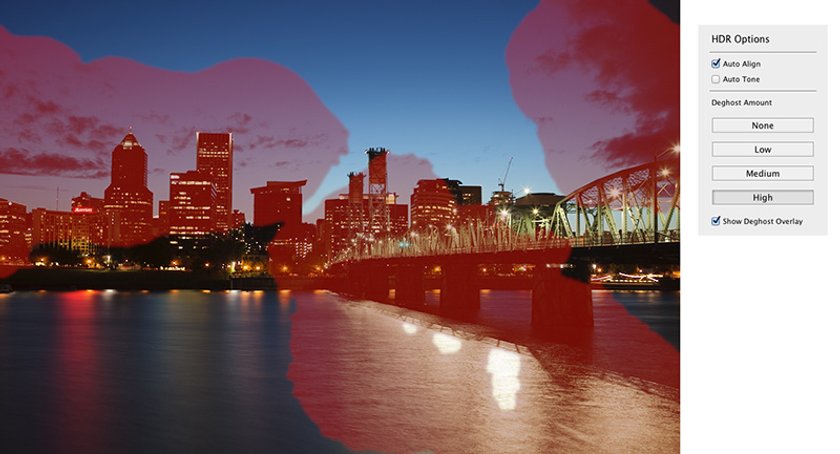
Auto Tone and Auto Align
Also in our Lightroom HDR tutorial, we want to talk about options such as Auto Tone and Auto Align. Let's look at each one separately.
Auto Align: Checking this box simply implies that you’re amending the little changes that may have occurred between images that were taken using a handheld camera device. Whether or not the image was shot handheld or using a tripod, it’s always a very good idea to check this option.
Auto Tone: It is generally advised that this option should be turned on; particularly because there is no other method of manually adjusting your image’s tone or exposure in the Lightroom environment.
Deghosting Features
Talking about how to do HDR in Lightroom, let’s take a closer look at the deghosting features of this app. Ghosting is generated from objects in the image that moves from shot to shot when shooting is being carried out in a bracketed sequence. If for example, a bird flies across the sky or scene in the course of your shooting, it’d appear in relatively different locations in each shot.
Consequently, after the images have been merged together, the resultant HDR image might end up with a translucent ghost of birds in various spots all over the sky.
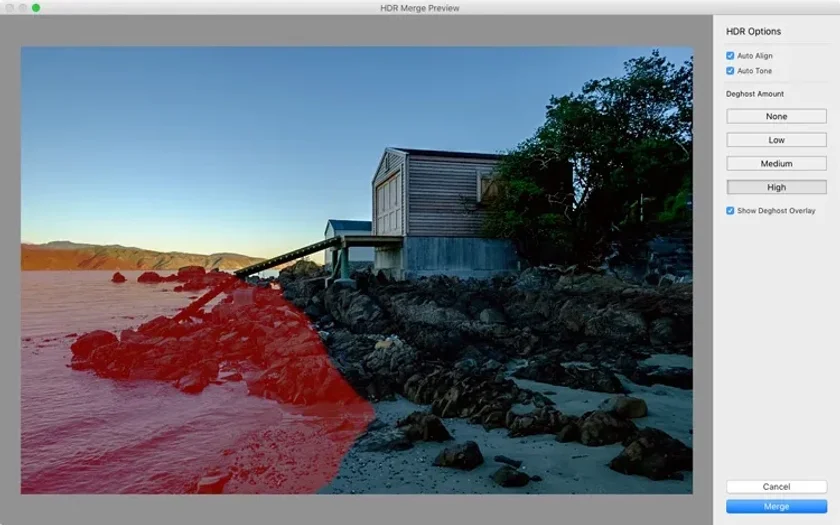
Deghosting options range from None to Low, Medium, and High. But if the ‘None’ option is not chosen, the Show De-ghost Overlay box can be checked. When selected, it shows a red translucent overlay effect.
Due to the sensitive nature of the de-ghosting technique, one might be right in saying that Lightroom does not feature a perfect de-ghosting tool. That notwithstanding, small de-ghosting effects can be applied and gotten away with.
In some cases, however, when you use Lightroom to merge photos, the de-ghosting could end up giving your image some horrible side effects. If care is not taken, the ghost bird might be fixed, but this might leave other problems in the picture Nevertheless, you’re more likely to achieve better results when you leave the ‘ghosts’ inside the HDR merge, then take them out later using the healing brush.
Further touch-ups like contrast, balance, and more, can be carried out on your resultant HDR image to give it a more enhanced look.
Merging into HDR
How to photo merge in Lightroom? This has always been the intended ‘destination’ – all other processes are for the sole purpose of giving us a perfect HDR merge. So, after all, the options have been settled, the next thing you want to do is to hit the ‘Merge button’.
Being an excellent organizer, Lightroom adds the resultant image to its original images library – but distinguishes the hybrid image by adding “HDR” to its filename. Irrespective of the filename extension you may have used, RAW originals, JPG, TIFF, and the like, the resultant merged HDR image will be saved as a DNG RAW file together with its application generated Develop Settings.
Once it is back in Lightroom, fine-tuning can be done to the Develop settings to suit your desired taste.
Common Problems with the HDR Workflow
For a more balanced knowledge of the subject, let’s briefly examine some of the artifacts that occur when you merge photos in Lightroom – particularly when processing complex images.
One is Deghosting Defects. This error or artifact does happen when one processes a complex image with lots of moving objects. They are often undetectable by the MEDIUM setting of Lightroom’s deghosting algorithm.
Using the ‘HIGH’ option, however, effectively takes care of the artifact issues but overrides the picture pixel elements in the image; in this case, the HDR technique may not apply to the ‘replaced pixels’.
Another is the ‘Islands’. This is caused by some incomplete deghosting and alignment effects. In this case, a kind of see-through patch is featured between two close figures. They are generally very minor, and difficult to notice – even on the entire screen. Nevertheless, this is still something to be considered especially if you have a thing for excellence.
Saturated Edges occur in situations where there is a distinct boundary between a light and a comparatively darker region of the photo. They are not always noticeable on large screens.
There are instances where there is a line separating the light and shadow areas. Alignment Algorithm might be the cause. It is important to point out that its occurrence is as a result of LR’s MEDIUM-deghosting not perceiving the area as problematic. This is also referred to as Shadow Edges.
The last on the list of common problems, when you use photo merge in Lightroom, is Blur Defect/Artefact. In an attempt to test LR’s extremes, two images were used and compared between HIGH and MEDIUM settings. The result was then placed side by side for comparison. HIGH-deghosting was carried out on the one, and MEDIUM-de-ghosting on the other.
A close look at the first image revealed that some parts of the background were blurred while some others were still sharp. The blurred section is consequence of the HDR algorithm while the bright part is that of the de-ghosting algorithm.
If the sharpness-detail lost by the HDR algorithm is to be recovered, an app like Photoshop must be used to produce a high-quality HDR image.
Final Thoughts
Lightroom offers a straightforward and powerful solution to create an HDR photo. Start by capturing bracketed exposures of the same scene, ensuring stability by using a tripod. Then, import your images into the app and select them to initiate HDR merge in Lightroom. The software’s intuitive interface allows you to adjust settings like alignment, ghosting, and tone mapping, enabling you to achieve the desired effect. Once the merge is complete, you can further enhance the image using comprehensive editing tools. Take advantage of Lightroom's HDR merge feature and unleash the full potential of your images.
Experience the Power of Luminar Neo
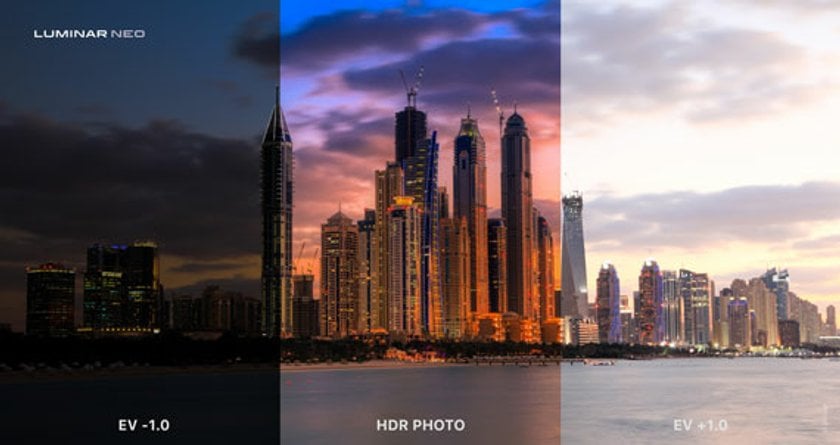
Now that you know how to merge photos in Lightroom, we want to tell you about another software that can handle this task even better. Luminar Neo is an innovative photo editor that offers a lot of powerful features for photographers of all levels. One of its notable capabilities is HDR merge, which allows you to create HDR images with stunning detail and a wide dynamic range. With this instrument, you can combine multiple bracketed exposures of the same scene to capture a greater variety of shadows and highlights. This enables you to create images with enhanced details in both the bright and dark areas, resulting in a more balanced and visually striking photograph. Luminar Neo is HDR photo editing software that provides a seamless process with intuitive controls, allowing you to preview the merged image and make adjustments to optimize the overall look.
Check Out Luminar Neo Now
Lightroom photo merge is quite handy, but if you need more professional tools, we have an offer for you. Unlock the power of AI picture enhance features in Luminar Neo and revolutionize your photo editing experience. By simply selecting one of the suggested plans and starting to process the images, you will see with your own eyes the incredible possibilities of AI technology. No longer do you have to rely only on Lightroom Classic for HDR photo merge; Luminar Neo offers a seamless alternative.
Compatible with both Mac and Windows PCs, this software is available to photographers of both platforms. Try it now and experience how your photos are enhanced like never before!
FAQ
What Is HDR and Why Should I Use It in My Photography?
It is a technique that combines multiple exposures of the same scene, capturing a wider range of brightness levels. By merging these exposures, HDR allows for greater detail and tonal range in the final image. It helps to create more balanced and visually striking photos that closely resemble what the human eye can see.
Can I Create HDR in Lightroom Without Using Multiple Exposures?
No, creating HDR in Lightroom requires multiple exposures of the same scene to capture a wider dynamic range. This feature combines the exposures to generate an HDR image with enhanced details and tones. Without multiple exposures, it is not possible to create HDR directly in Lightroom.
How Can I Achieve Natural-Looking HDR Images in Lightroom?
To achieve natural-looking HDR images, ensure you capture bracketed exposures of the same scene. Use Lightroom's HDR merge feature and then adjust the tone mapping settings to preserve details and avoid excessive contrast or saturation. Use localized adjustments if necessary and regularly check your image on a calibrated monitor for accurate color and tonal representation.