What is HDR and how to use it: learn from start to finish with the complete HDR tutorial.
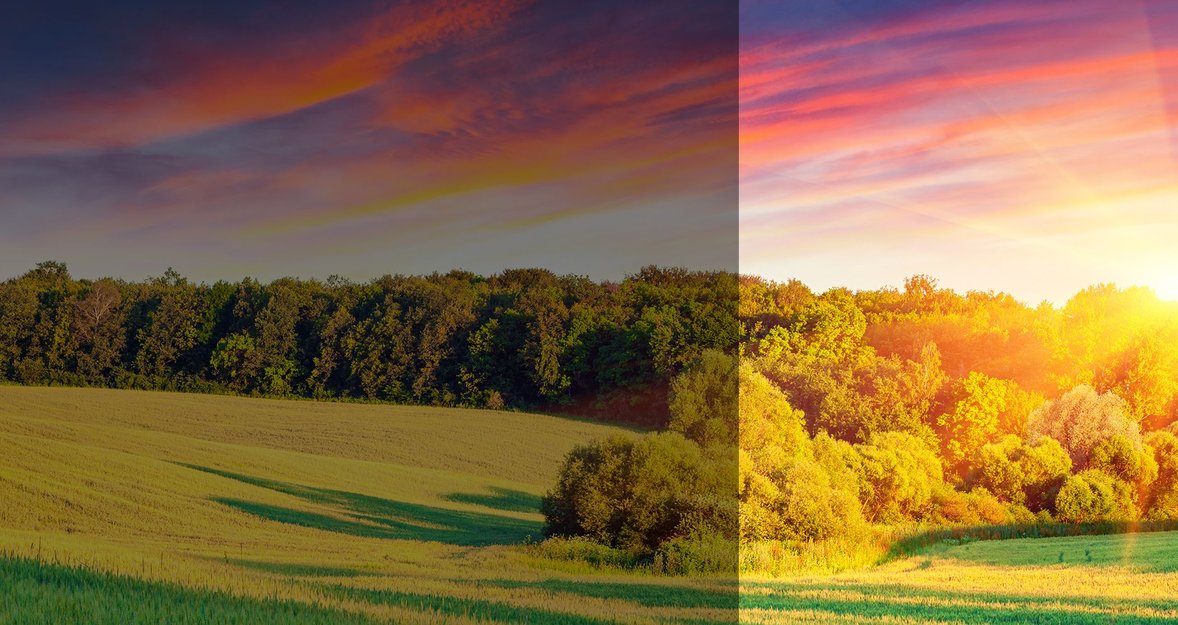
HDR photography is an acronym for “High Dynamic Range” photography. What does that mean? Well, the human eye can see so much more detail than a single photograph from any camera on the today’s market.
So when you take a single image of an epic landscape with beautiful bright skies and incredible colors reflecting off of your horizon and foreground, it’s heartbreaking to get home and see that the shot you’ve captured doesn’t even come close to displaying the details you have seen in person.
Speaking in camera terms, the human eye can see and process about 11 stops of light, whereas most cameras only can “truly” see about 3 ones . Clearly, there is a lot of information we can miss.
So how can we bring those cool moments we see in real life to the world of photography ? Well, that is where this HDR Photography tutorial comes in! We will show you how to use your camera and software to replicate what the eye can do.
You will have to set up your camera to take multiple photos of a scene at different exposures (or shutter speeds) to be sure you have captured the full spectrum of light. Don’t worry, it is really easy!
What is HDR Photography?
High Dynamic Range Photography is a process of capturing images at multiple exposure levels (also known as bracketing) to capture the lightest and darkest areas in a photograph.
And afterwards using software or in-camera technology to merge them together into a single “balanced” image.
How is a Full Dynamic Range Best Captured?
Sensors in Digital Cameras can only capture up to 3 full stops of light, so it is far less “dynamic range” than the human eye can see.
Software applications like Aurora HDR have been developed to tone map the image differently in shadow and highlights to provide the best distribution of lighting across your image. Aurora HDR bypasses the limited dynamic range of the camera sensor by merging multiple exposures of the same scene to maximize detail in light and dark areas.
Aurora HDR combines these brackets shot in camera to produce an HDR image.
Why Shoot HDR?
HDR Photography is often used to create a more accurate reproduce of an image that resembles what you can see with the eye. With right skills of how to take such photos, HDR Techniques allow to capture all the information in the lightest and darkest areas of a scene, and in some cases more emotion and “wow” factor than a normal photo.
Since HDR Techniques can capture a closer representation to what our eyes can actually perceive, it has the ability to make the viewers feel they were actually there!
What Do I Need for shooting HDR?
A camera can shoot in a “Bracketing” or “AEB/Auto Exposure Bracketing” Mode. While you can do everything you need for a true HDR shot manually, most new digital cameras come with a bracketing feature that will let you shoot from 3 to 9 frames.
Most HDR Photographers ideally also shoot in RAW format (regardless of your camera brand) since it has a much larger dynamic range than shooting with formats such as JPG. RAW files will preserve most of the information you have shot with the camera's sensor.
Since you are shooting with RAW files and you want the best detail possible, you will want to shoot with the lowest ISO possible to reduce the noise in your image. When you merge files with HDR it adds extra grain so you’ll want to start with as clear of an image as possible.
You will want a tripod and remote shutter release (or set the camera’s self-timer). These will let your camera stay perfectly still during your exposures, and the remote will let you shootframes without shaking the camera, again giving you increased stability to help reduce ghosting in your final shot.
For the truly perfect results, you will absolutely need HDR Software such as Aurora HDR software to take these RAW brackets and merge them together to create your perfect image.
Camera Settings for High Dynami Range Photos
Now when you know what you need, the next step is to go out and shoot! Make sure your batteries are fully charged and everything is cleaned and ready to go. As mentioned before you will want a tripod and remote shutter/intervalometer to make your images as smooth as possible.
Then you will just have to find the Bracketing feature on your camera and set it to the level you want. Most current DSLRs will give you the options of 3-9 shots at varied exposures from 0.3 to 2 stops a shot.
Enabling the Auto-bracketing feature will allow your camera to take multiple photos in a rapid sequence at a different shutter speed/exposure. Look for the “BKT” button or menu item on your camera to enable and choose your levels.
Make sure to shoot in Aperture priority or Manual mode to ensure that you are only changing the exposure time and not your fStop!
Upload/Import your images
When you are back to your computer you can upload/import your photos into Lightroom to begin your HDR Processing fun! I suggest using the software Aurora HDR Pro (either as a plugin or a standalone application) to create your stunning HDR images.
Export to Aurora HDR Pro
Now for the fun part! Let’s use Lightroom and select a few images to load into Aurora HDR. Choose the images from which you would like to create your HDR and then click right to view the context sensitive menu. Select EXPORT > EXPORT to Aurora HDR Pro.
You can also choose the option Use.TIFF with Lightroom adjusters if you’ve made adjustments in Lightroom that you would like to keep.
Aurora HDR Load Screen
From here Aurora will open a loading screen where you can make some choices about Alignment, Ghost Reduction and Chromatic Aberration Reduction options as required for your particular photo.
If your exposure brackets were shot on a tripod, more than likely you do not need Alignment. If there are no moving objects in your photos or high contrast areas, you will not need Ghost Reduction.
Chromatic Aberration Reduction will be needed if you are shooting directly into large light sources or are using a wider aperture setting. It will help to reduce your color fringing along the outer edges of your frame.
Then select “Create HDR” and Aurora HDR will open and operate as normal.
Editing your Image in Aurora HDR Pro
Now you will notice a slight difference with the top toolbar when your image opens when loading as a plugin with opening as a standalone application. The Open and Save/Export buttons will be replaced with an APPLY and CANCEL button.
Otherwise, the application is exactly the same! Start editing your image and make the adjustments as you like.
Creating your HDR Masterpiece
When you merge your HDR Brackets into Aurora HDR Pro, you will notice you have got a nearly perfect photo right out of the gate! But here is where it becomes really fun.
If you select the PRESETS button on the right bottom you can navigate your way through some pretty incredible looks in HDR from completely over the top “artistic” to very subtle and realistic. Every photo is unique, and you will never get the same results from photo to photo using the same presets.
So I recommend trying them all for each photo you load to see what direction really catches your eye and then edit manually from there.
Save Your File!
When you are done, hit the Apply button to save your changes to a new TIFF file that will be loaded back into Adobe Lightroom in the folder you were just working in (hitting Cancel will return you back to Lightroom with nothing changed at all). Now you can continue editing with Lightroom.
If you would like to make additional changes or export, publish and save as desired! It is so simple to create incredible HDR images!